Replacing the Rotor Seals
Issue
How do I replace the rotor seals?
Environment
- LX-2
- LX-4
Resolution
1. Determine which rotor seal type to install.
The following table lists the appropriate rotor seal type for each valve type. Part numbers vary by system type.
| Valve | Rotor Seal Type |
| VIM Valve A | Standard rotor seal |
| VIM Valve B on systems that are plumbed for Quick Elute Mode | Standard rotor seal |
| VIM Valve B on systems that are plumbed for Focus Mode | Hi-Res rotor seal |
| Autosampler injector and selector valves | See Aria Spare Parts |
2. Use a 9/64 Allen wrench to loosen the two screws on the face of the valve.
3. Loosen the screws evenly. Refer to image below.

4. Remove the screws and set them aside.
5. Grasp the valve face and pull it toward you to remove it.
6. Lift the rotor seal by lifting one of the tabs.
7. Remove the rotor seal and set it aside.
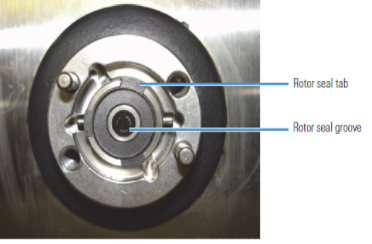
8. Line up the new rotor seal tabs to the slots on the valve and with the rotor seal grooves facing toward you. The slots are aligned so that the seal can only be installed at the proper orientation.
9. Press the rotor seal into place.
10. Reinstall the valve face so that ports 6 and 1 appear at the top.
11. Partially tighten one screw and then the other. Alternately tighten the screws until both are fully tightened.
12. Prior to running samples, make at least one blank (water) injection on the system.