Using the polarizer
Microscopes with the polarizer option include separate polarizers for visible and for infrared light.
For each light source, the microscope includes two polarizing filters called the polarizer and the analyzer.
-
Polarizer: Positioned between the light source and the sample
-
Analyzer: Positioned between the sample and the camera or eyepieces and the detector
When using the polarizer, you can insert either the polarizer alone (for plane-polarized light) or the polarizer and the analyzer (for cross-polarized light). The polarizer and analyzer can be rotated together or independently.
Using the polarizer and analyzer
To use the polarizers, start by viewing the sample in the camera view. Here, you can use the visible light polarizer and preview your polarizer settings for spectral data. The polarizer cannot be used during Particle Analysis or when measuring lines. It can be used to measure lines and points.
Previewing the sample in the camera view helps you find the ideal settings to using during the sample measurement.
❖ To use the polarizer and analyzer in the Camera View
-
On the dashboard, select Enable Polarizer acquisition.
With this option selected, regions are measured using the polarizer. If you do not change any settings, the default polarizer and analyzer settings are used. You can change your mind during the session and enable or disable the polarizer before you collect data.
-
Begin your microscopy session as usual.
-
In the Microscopy Setup view, open the Camera View and go to the Polarizer tab.
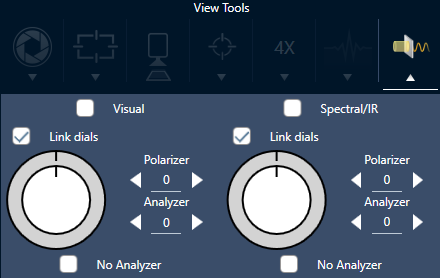
The polarizer tab in the Camera View
-
Select Visual to use the visible light polarizer. Select Spectral/IR to use the IR polarizer.
-
View the sample image in the Camera View while you adjust the visible light polarizer settings.
-
To preview the IR polarizer settings, turn on the Live Spectra view and view the spectrum.
Previewing polarized images and IR data in the Camera View
|
Setting |
Description |
|---|---|
|
Visual |
Select to enable the visual polarizer. |
|
Spectral/IR |
Select to enable the IR polarizer |
|
Link dials |
If selected, the polarizer and analyzer rotate at the same rate. Changing the angle for one also changes the other. |
|
Polarizer angle |
Set the angle of the polarizer. |
|
Analyzer angle |
Set the angle of the analyzer. |
|
No analyzer |
If selected, the analyzer is removed from the beam path and only the polarizer is used. |
Collecting IR data with the polarizer
When measuring your sample with the polarizer enabled, you can measure in two ways:
-
Measure the entire region with the polarizer (and analyzer, optionally) at a single, fixed angle.
-
Automatically rotate the analyzer during the measurement and collect data at a specified interval, such as every 5 degrees of rotation.
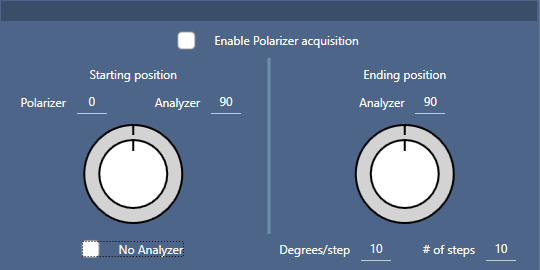
The Polarizer Setup options
❖ To collect data with the polarizer and analyzer
-
In the Microscopy Setup view, click Polarizer Setup in the toolbar to view the polarizer settings.
-
Select Enable Polarizer acquisition.
-
Edit and review your polarizer settings.
-
To use a single, fixed angle, set the # of steps to 1. Only the starting position of the analyzer is used.
-
For a stepped collection, …
-
Set the angle of the polarizer.
-
Set the starting and ending angles of the analyzers.
-
Set either the # of steps or the Degrees/step. The other setting is updated automatically.
-
-
-
Define one or more regions and measure the sample as usual.
The background point is automatically measured at each analyzer angle to correspond with the sample. During sample collection, each region is measured at every specified angle.
|
Setting |
Description |
|
|---|---|---|
|
Enable Polarizer acquisition |
Select to use the polarizer (and, optionally, the analyzer) in the data collection. |
|
|
Starting position |
|
|
|
|
Polarizer |
Fixed angle of the polarizer. |
|
|
Analyzer |
The starting angle of the analyzer. If the # of steps is set to 1, this is the only angle used. |
|
No Analyzer |
Select to remove the analyzer from the beam path and use only the polarizer. |
|
|
Ending position |
|
|
|
|
Analyzer |
The analyzer ending angle. |
|
|
Degrees/step (Degrees per step) |
Enter either the Degrees/step or the # of steps. The other value is calculated automatically. |
|
|
# of steps (number of steps) |
Enter either the Degrees/step or the # of steps. The other value is calculated automatically. |
Explore the polarized data
After collecting data with the polarizer, the results are shown in the Analysis tab. When viewing data collected with a polarizer, you can use the angle slider to view the profile image at each angle that was used in the collection.