Finding Measurements and Reports
When looking for saved measurements and reports, use tags and search keywords to filter the measurements and reports lists.
Searching
When you search for a measurement, the search term is checked against information such as the spectrum tags, title, last modified date, identified compounds, custom strings, serial numbers, etc. If you search for a report, fields used for the search include report name, date created, and the template type.
Tip Click a column header, such as Measurement Name or Type, to sort the measurements. By default, measurements are sorted to show the most recently modified item first.
❖ To search for measurements and reports
- Select either Reports or Measurements from the list.
- Select a time to limit the search results.
- Enter your search terms and click Search.
Use the following search techniques to refine your results.
|
Search Technique |
Description |
Example |
|
Quotation Marks (“”) |
Use quotation marks to return only exact matches from the tags. This is useful if you are searching for a two-word tag and do not want to see spectra tagged with only one of the words. |
“red blue” Returns: only spectra with the tag “red blue”. Does not return spectra with tags “red” or “blue” separately. |
|
* (asterisk) |
Add an asterisk (*) to the end of your search terms to return all results that include the text preceding the asterisk Note: The * can be appended to the end of the search terms but cannot come before other terms. |
Poly* Returns: Any measurement with a term beginning with poly, such as polystyrene. |
|
AND, OR, NOT operators |
These keywords must be in all capital letters, as shown. AND: Returns only results that contain both terms. OR: Returns results that contain either keyword. NOT: Returns only results that contain the first term but do not include the term after NOT.
|
Sample AND Background Returns: Only measurements that have both Sample and Background in the searched fields. Sample OR Background Returns: Measurements with either sample or background in the data are returned. Sample NOT background Returns: Measurements or reports that have sample in the data and do not have background in the terms. |
|
title:<keyword> |
Use to specify that the keyword must be in the measurement or report title. |
title:poly Returns: measurements with poly in their name, but those with poly elsewhere (such as identified compounds) are ignored. |
|
tags:<keyword> |
Use to specify that the keyword must be a tag. If the tag is two words, use an underscore instead of a space. |
tags:blue Returns: measurements with blue as a tag, but those with blue elsewhere (such as the measurement name) are ignored. “blue_powder” searches for the two word tag “blue powder”. |
Tagging
Tags give you another convenient way to locate measurements and reports in your database. For example, if you are collecting many measurements related to a single project, you might tag each of those measurements with the same “Project A” tag. Later, you can use this tag to filter your measurements to show you only measurements with the “Project A” tag.
❖ To add or delete a tag in the desktop interface
- Right-click a measurement in the Measurements list and select Manage Tags. Tags currently assigned to the measurement are listed under Current Tags.
- To add a new tag, enter text in the New Tag field and click Add. The new tag is added to the current tags.
- To delete a current tag, click the delete icon ( )in the upper right corner of the tag. The tag is removed immediately.
- To save your changes, click OK. Click Cancel to exit the Manage Tags dialog without saving the changes.
❖ To add or delete a tag in the touchscreen interface
- From the Home screen, navigate to the Measurements tab.
- Select a measurement and touch the more options icon.
- Touch Manage Tags.
- To add a tag, enter text in the New Tag field and touch Add. The new tag is added to the current tags list.
- To delete a tag, touch the delete icon ( )in the upper right corner of the tag.
- To save your changes, touch OK. Touch Cancel to exit the Manage Tags dialog without saving the changes
Filtering measurements by their signature status
Use Signature filters to quickly find measurements, reports, and sessions based on their signature status.
For example, the Signature filter is great for finding measurements that have been signed with an Authorship reason but that still need to be approved.
❖ To filter your records based on the signature status
- From the dashboard of the Desktop interface, click Signature.
- Select your filter options and click OK.
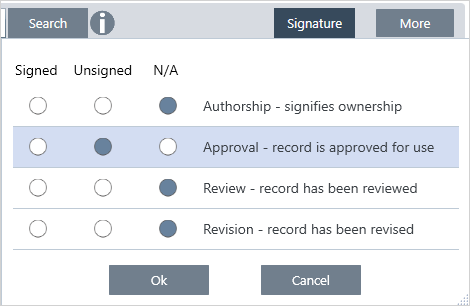
The dialog shows a list of all signature reasons. For each reason, you can select signed, unsigned, or N/A.
- Signed: Select to show records signed with this reason. Any records signed with this reason are shown.
- Unsigned: Select to show records that have not been signed with this reason. Any records with this signature are not shown.
- N/A: Ignore this reason when filtering. Records with and without this signature are shown.
In this example, these settings will show all the records that still need to be approved.
Tip Double-click the column heading ("Signed") to select that column for all options. Double-click again to reset all options to N/A.
Tip The Signature filter works with the time filter. For example, to see all measurements from the past month that need to be approved, set the time to Past Month and the signature filter for Approval to Unsigned.
Tip To sign multiple records at once, after you filter them, select all records, right-click, and select Sign.