Create a Template Workflow
A template workflow allows you to create a single workflow that can be run using dynamic values depending on the situation. For example, with a template workflow, you can create a single workflow that can be run using several different sampling accessories. The operator can select an accessory and the workflow will be updated automatically to use images, quantification methods, and variables that match the accessory.
To create a template workflow, use the Workflow Table tile. With the Workflow Table tile, you import a table of options and corresponding values from a CSV file. Then use the values throughout the workflow.
With a Workflow table tile, you can …
- import many files and variables at once
- allow the operator to select from a list of options or automate the selection
- import custom variables or reference external files, such as images or QNT files
Using the Workflow Table tile requires you to build a CSV file of the options and data you want to include, configure the Workflow Table tile, and use the included data.
❖ To create a template workflow with the Workflow Table tile
Step 1: Create a CSV file for your data
-
Create a CSV file to import with the Workflow Table tile.
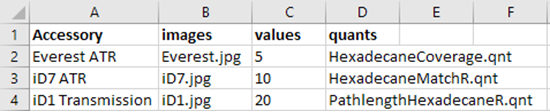
The following example shows a table with three accessory options
-
Structuring the table. When creating the table, each row reflects an option or a category of related values. For example, you might use each row for an accessory, with the columns for data and files associated with that accessory. When developing your workflow, the column headings are used as variables. You can create the table directly as a CSV file, but it may be easier to work with a table in a spreadsheet program and then export the data as a CSV file.
-
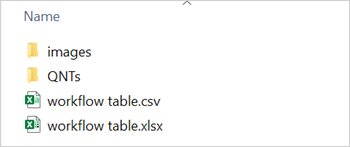
Organizing your external assets. When referencing external assets, such as image or QNT files, keep your files very organized. This will make them easier to import in the Workflow Table tile and to update later.
Keep referenced assets organized
-
-
Save the table as a CSV file.
This image shows the table as a CSV file

Step 2: Create the workflow and configure the Workflow Table tile.
-
In OMNIC Paradigm software, go to File > Workflows > Create. Name the workflow and select OK to open the Workflow Editor.
-
Add any desired tiles to the workflow.
-
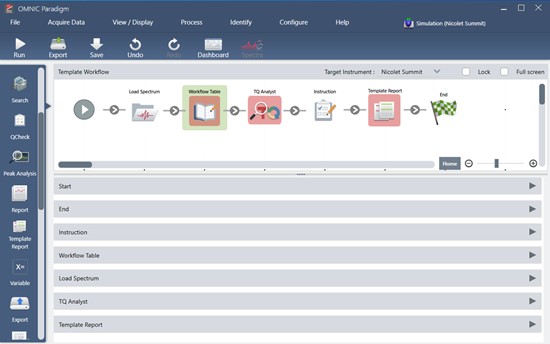
Add the Workflow Table tile to the workflow. The placement of the Workflow Table tile depends on your individual requirements.
This example workflow uses the workflow table tile near the start
-
Double-click the Workflow Table tile to open the tile settings.
-
Configure the Workflow Table tile.
-
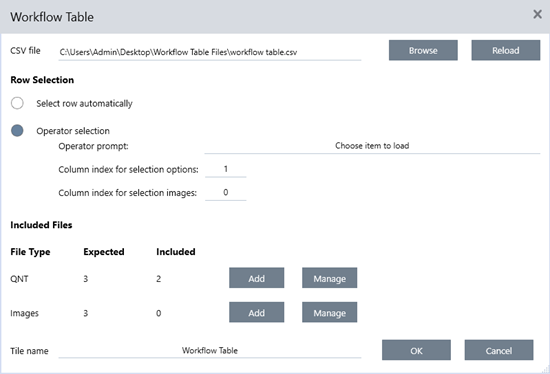
Select Browse and open your CSV file.
If the CSV file included references to image, QNT, or SPA files, the tile indicates that the template expects additional files and provides a button to add and manage files.
-
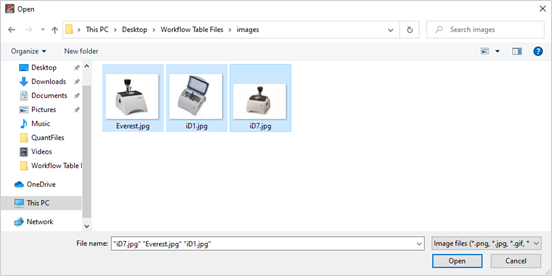
For each category of required files, select Add and open the associated files that you listed in the CSV file. The file name must match exactly what you included in the CSV file.
These image files match the filenames in the CSV file
-
To prompt the operator to select an option, select Operator Selection and choose a column. The column index of options determines which column of data is used for the options presented to the operator. The first column is column 1. You can also specify a column of images to display with the options. Set the index to 0 if you do not want to show an image.
To choose a row automatically, select Select row automatically. The first row is row 1. You can enter a specific value or use a variable. For example, use the Variable tile to increase the Repeat_Count variable from a Repeat tile by 1, then use the new variable to automatically loop through all of the options.
-
Step 3: Use the imported files and variables
-
Select another tile where you would like to use data from the Workflow Table tile. How you use values from the Workflow Table tile depends on your specific needs. Consider the following examples:
-
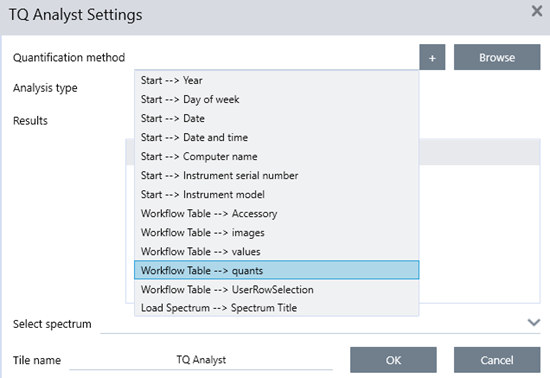
To use a QNT file: In the TQ Analyst tile settings, select the + icon to select a variable. Select the Workflow Table variable that corresponds to the QNT files in your CSV file.
-
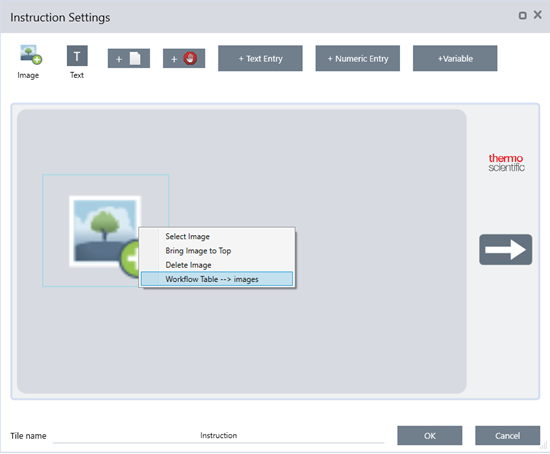
To use an image in an Instruction tile. In the Instruction tile, click Image to add an image. Right-click the image placeholder and select the appropriate Workflow Table value.
-
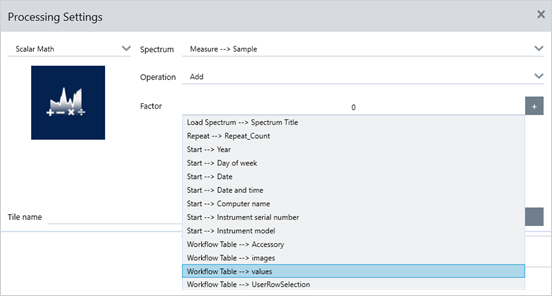
To use a value as a variable. Select the + icon in the tile settings and select a Workflow Table variable.
-
-
Save the workflow.
Step 4: Test your Workflow
It is a good idea to test your workflow to be sure that everything is loaded and working as expected.
If you workflow includes measuring data, you may want to use the Simulator mode to simplify the test.
-
(optional). Switch to Simulator mode.
- Return to the dashboard.
- Go to Configure > Connectivity.
- Select Simulator and select Connect.
- Choose an instrument to Simulate and select OK. It may take a moment for the software to switch to the new simulated instrument.
-
Open your workflow in the Workflow Editor.
-
Select Run to run the workflow. Note that if your workflow measures data, the measurements will be saved to your database just as they would during a normal workflow. You may wish to delete these measurements that use simulated data.