Replacing the desiccant
Follow the instructions in this section to replace the desiccant cartridges.
| We recommend that you maintain seal and desiccation and/or purge your instrument at all times. Equipment damage due to failure to maintain seal and desiccation and/or purge is not covered under the warranty. If you have questions about this requirement, please contact us. |
Time needed: 3 minute or less
Tools needed:
- 4-in1 tool (included with your instrument)
- 2 replacement (or regenerated) desiccant canisters
| Use only Thermo Scientific certified replacement parts. To order parts, contact us. Make sure nothing falls into the instrument while the desiccant cover is removed. |
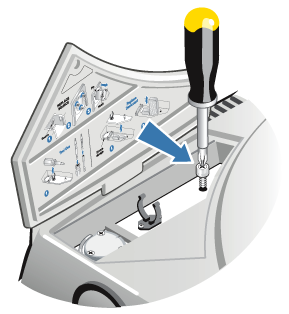
- Open the tool compartment, and use the 4-in-1 tool, with the large Phillips bit installed, to loosen the captive screw in the desiccant cover.
Lift off the desiccant compartment cover and put it in a safe place.

 |
Avoid hazard. The contents of the desiccant canisters can be harmful if ingested. If you discard the saturated desiccant canisters, make sure they are properly disposed of. |
- Lift the saturated desiccant canisters out of your instrument and install the new desiccant canisters.

- Use the 4-in-1 tool to install the desiccant cover, and then replace the 4-in-1 tool in its compartment and close the tool compartment door.
| If the humidity indicator has turned white or does not return to blue after the desiccant has been replaced, you must replace the humidity indicator. |