Replace the desiccant
If your instrument is not equipped with a purge kit, or if the purge is turned off, you must monitor the humidity level inside the spectrometer. Replace the desiccant when the paper humidity indicator turns pink (can be light pink or almost white). Replace the paper humidity indicator each time you replace the desiccant.
Replacing the desiccant requires you to remove the desiccant cartridge and replace the desiccant canisters and the O-ring.
Tools Needed
Before you begin, you will need the following:
- Desiccant replacement kit
- A 0.05-inch hex key
- A #2 Phillips head screwdriver
- Gloves, finger cots, or laboratory tissue (to handle the humidity indicator)
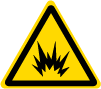 |
Avoid explosion hazard.
Before opening the desiccant compartment, turn off the instrument power, unplug the power cord and remove all accessories and samples from the system. Entry of flammable liquids or gases into the desiccant compartment is an explosion hazard. If such entry occurs, contact us immediately and do not apply power to the instrument until the condition has been corrected. |
|
Make sure nothing falls into the instrument while the desiccant cover is removed. |
 |
Replace the desiccant only with replacement parts supplied by us. |
To replace the desiccant
-
Turn off the spectrometer.
- To turn off the spectrometer, press the power button.
-
Unplug the power cord.
-
Turn off the purge, if applicable, and disconnect the purge line to the instrument and any accessory.
You can use either desiccant cartridge (with or without the purge connector) to maintain the required humidity. The illustrations below show the nonpurged version of the desiccant cartridge. The instructions for replacing the desiccant canisters are the same for both cartridges.
-
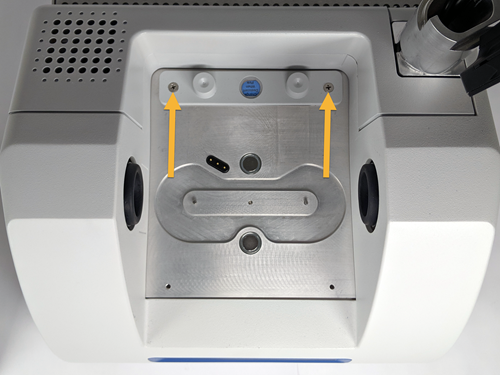
Remove the desiccant cartridge.
-
Remove any installed accessory and all samples from the instrument.
-
Use the #2 Phillips head screwdriver to loosen the two captive screws from the desiccant cartridge, and lift the cartridge straight up and out of the instrument.
-
Remove and discard the large O-ring.
Be careful to not drop the O-ring into the desiccant compartment.
-
-
Remove the desiccant canisters and replace the humidity indicator.
The contents of the desiccant canisters (hydrated metal aluminosilicate molecular sieve) could be harmful if ingested. If you discard the saturated desiccant canisters, make sure they are properly disposed of.
-
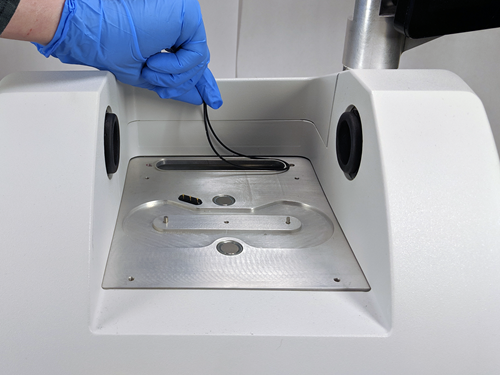
Use the 0.05-inch hex key to loosen (approximately two turns) the eight screws that hold the two saturated desiccant canisters to the desiccant cartridge. Remove the canisters.
1. Desiccant cartridge
2. Remove these screws (four on each side)
3. Desiccant canisters
-
Turn the desiccant cartridge upside down and peel the old humidity indicator off the window. Discard the used indicator.
Always wear lab gloves or finger cots, or use laboratory tissue, when handling a new humidity indicator. Oil or moisture from skin can discolor the indicator.
-
-
Install the new desiccant canisters.
-
Open the sealed packet that contains the new desiccant (must be sealed to maintain the desiccant) and remove the new humidity indicator.
-
Turn the desiccant cartridge upside down and press the blue indicator onto the window so that the flat edges of the indicator are aligned with the edges of the cartridge. The text should be visible through the window when you turn the cartridge right side up.
Make sure that the indicator is pressed tightly against the window so that it does not come loose in the desiccant compartment when you reinstall the cartridge.
-
Insert the canisters into the channel of the desiccant cartridge and tighten the eight screws (approximately 2 turns) until they are flush with the cartridge channel.
-
-
Insert the desiccant cartridge.
-
Remove the new O-ring from the packet and install it on the instrument base plate.
Press, rather than roll, the new O-ring into place to be sure it is properly seated in the groove.
-
Insert the desiccant cartridge into the spectrometer so that the text on the humidity indicator can be read by someone standing in front of the instrument.
Make sure the cartridge is seated properly over the O-ring and then use the #2 Phillips head screwdriver to tighten the two captive screws.
-
-
Turn on the spectrometer.
-
Plug in the power cord to the instrument and turn on the power.
-
Reconnect the purge line to the instrument, if applicable, and turn on the purge.
-
-
Verify the spectrometer’s performance.
Before taking the following steps, make sure there is not a sampling accessory in the sampling compartment.
-
Align the spectrometer optics.
- From the dashboard of OMNIC Paradigm software, go to Acquire Data > Diagnostics > Align Spectrometer.
- Select Start to begin alignment. The screen says "Align complete" when alignment has finished successfully.
-
Calibrate the laser.
- Go to Acquire Data > Diagnostics > Laser Calibration.
-
Select Start to begin calibration.
Laser calibration may take several minutes to complete. When calibration is finished, the display shows "Measurement complete" and indicates any change in laser frequency.
The instrument takes up to 12 hours to come to thermal equilibrium. For best results, re-run alignment and calibration after the first 12 hours of operation.
-
Run thet Nicolet FTIR – Factory Qualification workflow. Performance verification and qualification workflows use a polystyrene reference material inside the spectrometer to run a series of standard tests to verify your instrument operation and to ensure the accuracy of your data.
- Return to the Dashboard.
- Scroll to the Workflows pane and select Nicolet FTIR - Factory Qualification.
- Right click the workflow and select Run to start the workflow.
-
Attachment(s):
| File | Last Modified |
|---|---|
| 115387_Summit Standard Desiccant Cartridges with nums.jpg | July 22, 2022 |
| 115384_Summit desiccant oring.png | July 22, 2022 |
| 115350_Summit inside compartment captive screws.png | July 22, 2022 |