Unpack and Get Started with the Spectrometer
Unpacking and setting up your Thermo ScientificProduct NameSpectrometers requires you to place the instrument in your workspace, to connect and power on the spectrometer, and to run a short performance test.
Before You Begin
Wait 24 hours before taking the spectrometer out of its plastic shipping bag to prevent condensation from forming that can damage internal optics. The warranty will not cover damage due to opening the sealed plastic bag before the instrument has come to room temperature.
Reminder: Review the spectrometer's Site and Safety Information to ensure that the workspace is safe and suitable for the instrument.
What’s in the Box?
The Summit spectrometer comes with several accessories and options. The following image shows what comes with your spectrometer, including many optional add-ons.
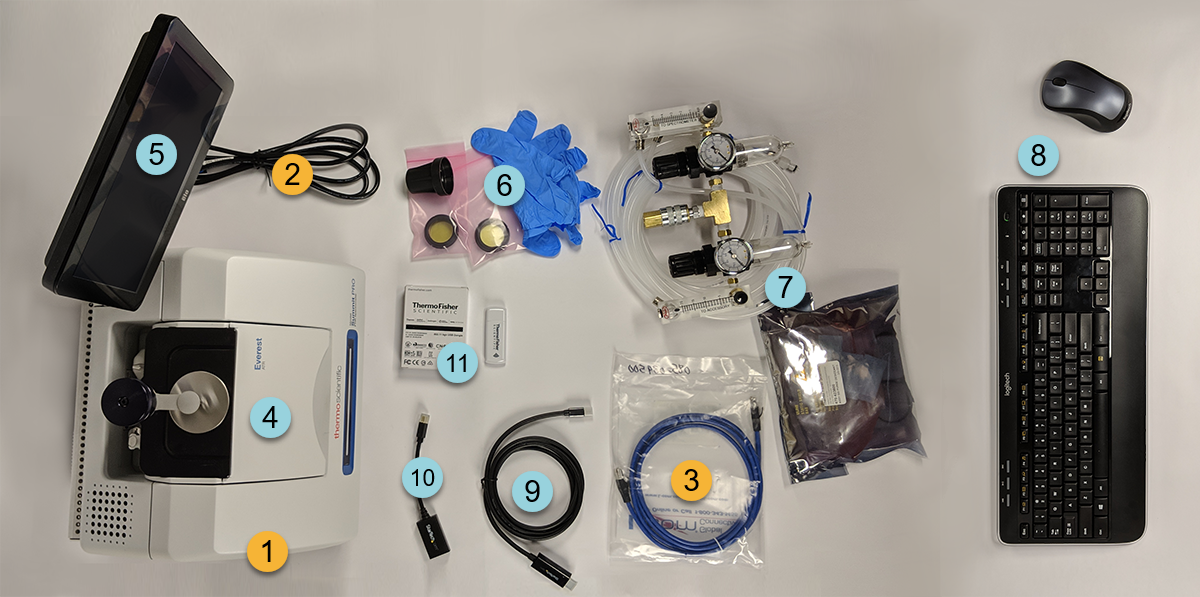
| 1 | Summit or Summit PRO Spectrometer | 7 | Purge kit |
| 2 | Power cord | 8 | Wireless keyboard and mouse (not shown: USB extension cable) |
| 3 | Ethernet cable | 9 | Mini DisplayPort cable (included with the optional 22” high-definition monitor) |
| Optional | 10 | Mini DisplayPort to HDMI adapter | |
| 4 | Everest ATR Accessory | 11 | WiFi access dongle (comes pre-installed if purchased) |
| 5 | Touchscreen monitor | Not shown: Optional 22” High-Definition Monitor | |
| 6 | ZnSe window replacement kit, including window replacement tool and nitrile gloves | ||
Unpacking and Setup
The steps for unpacking and setting up your spectrometer vary somewhat depending on the options you purchased.
-
Unpack the shipping box
Remove the spectrometer from the shipping box and bag and remove additional packing materials.
Use care when lifting the spectrometer.
- Do not grasp the touchscreen monitor to lift the spectrometer.
-
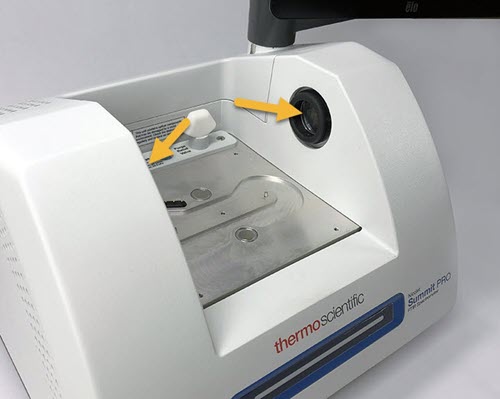
Do not touch the sample compartment windows while unpacking the instrument. Touching the windows could cause permanent damage.
-
Set up the monitor.
If you have the attached touchscreen monitor, grasp the monitor by the sides and position it to face the front of the instrument.
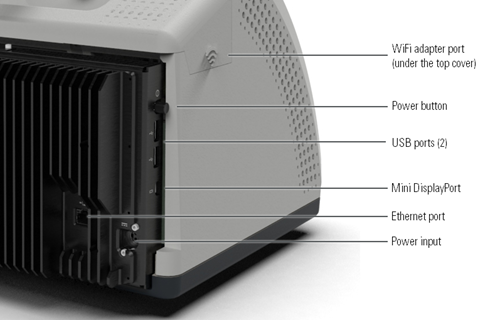
If you are using an external monitor, connect the monitor to the spectrometer using the Mini DisplayPort. If you are also using the optional wireless mouse and keyboard, use the provided USB extension cable to position the wireless receiver farther from the USB inputs.
Some USB and Mini DisplayPort devices are known to interfere with the signal from wireless USB devices, such as wireless keyboards and mice. If you notice performance issues with your wireless keyboard and mouse, such as lag or delayed or missed input, use the provided USB extension cable to position the wireless USB receiver farther from the USB ports.
-
(Optional) Replace the sample compartment windows.
If you purchased the ZnSe windows option, replace the windows. For instructions on replacing the windows, see Replace the Sample Compartment Windows.
-
Turn on the spectrometer.
You must create a new password the first time you power on the spectrometer. If this password is lost or forgotten, all data saved on the spectrometer will be unrecoverable. It is recommended that you leave the password blank during initial setup and later create a secure password and additional user accounts as needed.
- Connect the power supply to the spectrometer and to a properly grounded AC power source.
- Press the instrument's power button to turn on the spectrometer. The spectrometer's LightBar will display a cycling green light while the instrument warms up and will show a solid green bar when the instrument is ready for use.
-
Verify the spectrometer’s performance.
Before taking the following steps, make sure there is not a sampling accessory in the sampling compartment.
The instrument takes up to 12 hours to come to thermal equilibrium. For best results, re-run steps b and c after the first 12 hours of operation.
-
Launch the Thermo ScientificOMNIC Paradigm software. The first time the software starts, it will open with the touchscreen interface. Later, you can switch between the touchscreen and desktop interfaces.
The software displays the connection status in the upper right corner of the screen. When the status shows you are connected, proceed to the next step.
-
Align the spectrometer optics.
- Touch the diagnostics icon [
 ] to open the instrument diagnostics.
 - Navigate to the Align tab and touch Align. The alignment process may take several minutes to complete.
- Touch the diagnostics icon [
-
Calibrate the laser.
Navigate to the Laser Calibration tab and touch calibrate. Laser calibration may take several minutes to complete. When calibration is finished, the display shows "Measurement complete" and indicates any change in laser frequency.
-
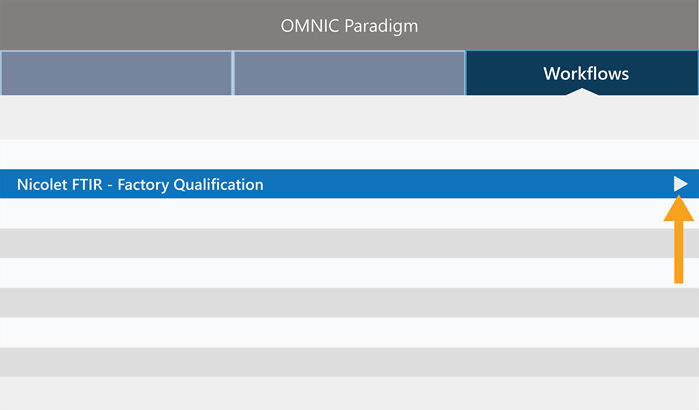
Run the Nicolet FTIR – Factory Qualification workflow. Performance verification and qualification workflows use a polystyrene reference material inside the spectrometer to run a series of standard tests to verify your instrument operation and to ensure the accuracy of your data.
For more on performance verification and qualification workflows, see Qualify Your Spectrometer.
- Return to the Home screen.
- Navigate to the Workflows tab and select Nicolet FTIR - Factory Qualification.
-
To run the workflow, touch the Run icon and follow the on-screen prompts.
-
-
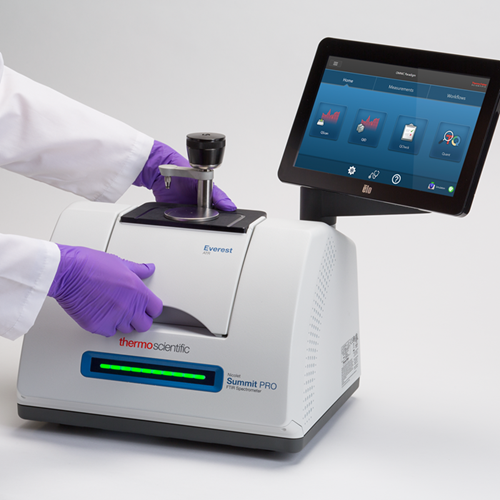
Insert a sampling accessory.
To install the optional Everest ATR accessory or iD1 Transmission accessory, grasp the accessory by the front and rear handholds and lower the accessory onto the spectrometer. Sampling accessories fit over two alignment pins on the spectrometer baseplate and are held in place by strong magnets.
- For details on installing an accessory, see Install a Sampling Accessory.
- For details on using the Everest ATR accessory, see Sampling Accessories.
Next Steps
Congratulations! Your instrument is ready for use. However, before you start collecting data, back up your system and create a recovery drive to protect your system from potential problems in the future. Windows 10 includes several built-in tools for backing up and recovering your data.
For instructions on creating a recovery drive and system image and on restoring your system, see Back up and Recover Your Data.
Attachment(s):
| File | Last Modified |
|---|---|
| 115258_Summit-Installing-Everest-Accessory.png | July 21, 2022 |
| 115519 run-pv_thumb.png | July 21, 2022 |
| 115368_Paradigm touchscreen diagnostics icon.jpg | July 21, 2022 |
| Summit ports callouts_thumb.png | July 21, 2022 |
| 115299_Summit Window Locations.jpg | July 21, 2022 |
| 115517 Summit boxContents.png | July 21, 2022 |