Issue
How to center a 15X or 32X Reflachromat Continuum Objective
Environment
- Nicolet Continuum FT-IR Microscopes
- 15X or 32 Reflachromat Continuum Objective
Resolution
Follow these steps to center a 15X or 32 Reflachromat Continuum Objective. This procedure requires 3 1/16" ball drivers or Allen wrenches.
- Scope should be in reflectance mode and a target slide positioned on the stage. Use your gold mirrored reference slide.
- Using the 10X fixed visual objective, locate a reference target for yourself on the mirror (e.g., a small spec on the surface of the mirror, or a point where two scratches intersect).
- Align your chosen target to the center of the eyepiece reticule. NOTE: It is imperative that during this procedure the stage itself not be moved/bumped etc. The position of the stage is your reference point.
- Carefully rotate the nosepiece from the 10X position to the 15X position, ensuring the nosepiece is in it’s detent for that position. Refer to Figure 1.
- Using the eyepiece, focus if needed (being careful not to disturb the stage) and determine if the target located with the 10X is centered in the cross hair of the reticule.
- If needed, carefully insert your 3 ball drivers or Allen wrenches in to each of the 3 centering adjustment screws shown to the right. Adjust the centering position of the objective by gently loosening one screw and tightening another. Do this walking your reference target into the cross hair of the reticule.
- Switch back to the 10X confirm that it is still positioned over your target.
- Repeat as needed.
- Ensure ALL 3 set screws are snug.
|
Figure 1: Nosepiece is in position to the 15X position
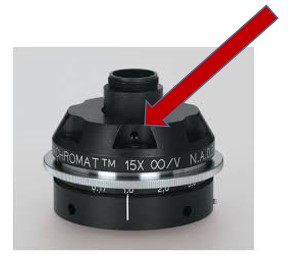
Figure 2: The 3 adjustment screws are shown in these 2 photos. You will need to access all 3. If access is prevented to any of the screws due to the rotation of the objective, you will need to loosen at least two of the screws slightly and rotate the objective to a point where the 3 screws can be accessed with a ball driver, and snug down the screws before starting the rest of the procedure.

|