Install and Maintain a Purge Kit
Purging the spectrometer with dry air or nitrogen protects the internal components from moisture and other environmental contaminants. Installing the purge kit requires you to assemble the valves and regulators, replace the desiccant cartridge, connect the purge gas, and set the pressure and flow rate.
 |
Avoid explosion hazard Never use a flammable, combustible, or toxic gas to purge this instrument. The purge gas must be free of oil and other reactive materials. Heat from the source or from laser absorption may ignite flammable gases or reactive materials in purge gas. Use only dried air or nitrogen to purge your instrument. |
|
We recommend maintaining the seal and desiccating and/or purging the instrument at all times. The warranty does not cover damage caused by a failure to properly desiccate or purge the instrument. If you have questions about this requirement, please contact us. |
Setup needed
Before installing the purge kit, you will need a source of dry air or nitrogen that meets Thermo Scientific specifications for the Nicolet™ Summit Spectrometer. See the instrument’s Site and Safety guide for details.
For best results, dry the purge gas to a dew point of -70 °C (-94 °F) or below.
Materials needed
Your purge kit includes the following:
- Dual zone purge manifold
- Purge desiccant assembly, with purge desiccant cartridge and O-ring
In addition to the purge kit, you will need the following tools and materials:
- 3/4-inch open-ended wrench
- 11/16-inch open-ended wrench
- #2 Phillips head screwdriver
- Thread seal tape (“plumber’s tape” or “Teflon tape”)
To install a purge kit
-
Attach the plumbing assembly to the purge gas source.
-
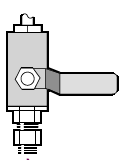
Install the regulator valve and either a 1/4-inch male fitting or a 3/8-inch female fitting on the purge gas source. (Choose a valve and fittings that are appropriate for the purge gas source.)
-
If you used a 1/4-inch male fitting, proceed to the next step.
-
If you used a 3/8-inch female fitting on the purge gas source, install the 3/8-inch to 1/4-inch reducing nipple that was included with your purge kit. Wrap the reducing nipple with thread seal tape before you install it, and use an 11/16-inch open-ended wrench to tighten the connection.

-
Wrap the reducing nipple or the 1/4-inch male fitting with thread seal tape, and then install the pressure coupling. Use a 3/4-inch open-ended wrench to tighten the connection.
-
Snap the male inlet of the wall plumbing assembly firmly into the quick release fitting.
-
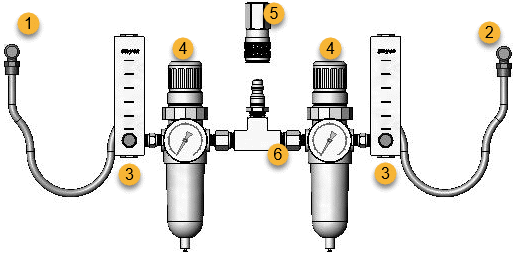
1. To accessory
2. To spectrometer
3. Flowmeter
4. Pressure regulator
5. Quick release fitting
6. Wall plumbing assembly
-
Replace the desiccant cartridge.
-
Turn off the instrument power, unplug the power cord, and remove all accessories and samples from the system.
Avoid explosion hazard.
Before opening the desiccant compartment, turn off the instrument power, unplug the power cord and remove all accessories and samples from the system. Entry of flammable liquids or gases into the desiccant compartment is an explosion hazard. If such entry occurs, contact us immediately and do not apply power to the instrument until the condition has been corrected.
-
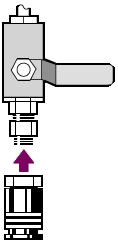
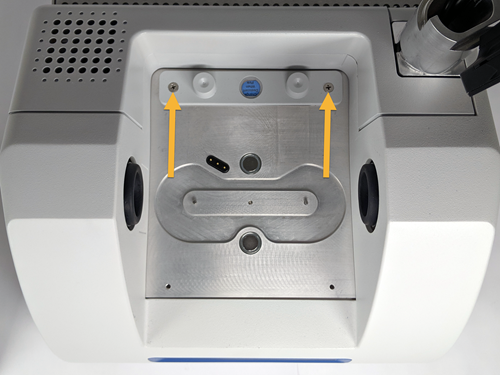
Loosen the two captive Phillips head screws from the standard desiccant cartridge, and lift the cartridge straight up and out of the instrument.
If the standard desiccant cartridge is stored in a dry box or sealed bag (you can use the bag the purge cartridge came in), the cartridge can be reused.
-
Remove and discard the large O-ring.
Open the purge kit and the sealed desiccant packet.
-
Remove the O-ring from the packet and install it on the instrument base plate (see previous image). Press (rather than roll) the new O-ring into place to be sure it is properly seated in the groove.
-
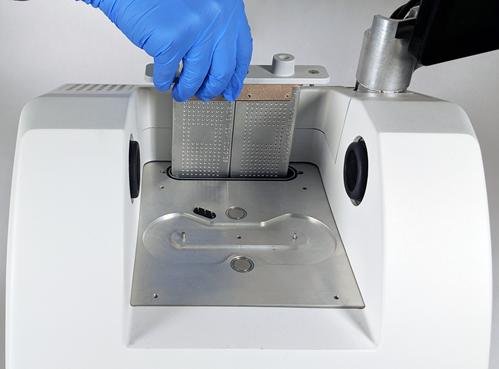
Remove the desiccant cartridge with purge fittings from the packet, insert the cartridge in the desiccant compartment, ensure that it is seated properly over the O-ring, and then secure it using the two screws.
Note the correct orientation of the cartridge. You should be able to read the label on the cartridge from the front of the instrument when the cartridge is installed.
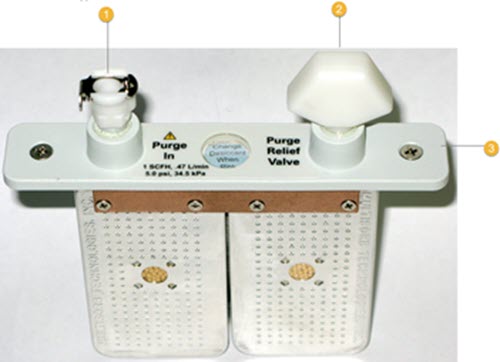
1. Purge inlet
2. Relief valve
3. Purge desiccant cartridge
-
-
Connect the purge gas source to the instrument.
- Connect the flow coupler from the wall plumbing assembly (labeled “to spectrometer”) to the purge inlet on the desiccant cartridge.
-
Install any sampling accessory you removed previously.
-
If you are purging the accessory, connect the straight flow coupler from the plumbing assembly (labeled “to accessory”) to the purge inlet on the installed accessory.
-
Set the purge gas controls.
-
Open the main regulator valve and set the purge gas controls as indicated below (see Setting the Purge Gas Controls for details). If you are not purging the accessory, set the pressure regulator for accessories to zero.
Hardware
Pressure (psig)
Flow Rate (scfh)
Summit Spectrometer
5
1
Everest Accessory
5
4-10
iD1 Transmission Accessory
5
4-10
iD3 ATR Accessory
5
4-10
iD5 ATR Accessory
5
4-10
iD7 ATR Accessory 5 4-10 iD Foundation
5
4-10
-
Plug in the power cord to the instrument and turn on the power.
-
Wait 30 - 60 minutes for the instrument to fully purge.
-
Set Purge Gas Controls
Correctly setting your purge gas controls will protect your spectrometer from humidity without introducing vibration.
For best results, the purge gas should be dried to a dew point of ‑70 °C (‑94 °F) or below.
To set the purge gas controls
- Open the main valve to start the flow of purge gas through the regulator.
-
Adjust the pressure regulator for the spectrometer until the gauge indicates that the pressure is 5 psig (34 kPa).
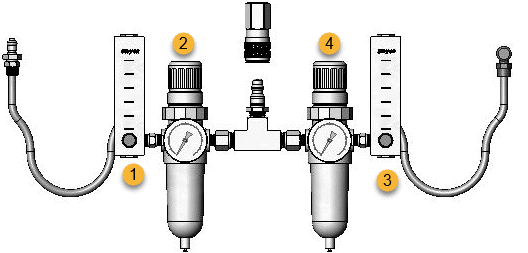
1. Set accessory flow
2. Set accessory pressure
3. Set spectrometer flow
4. Set spectrometer pressure
-
Set the flowmeter for the spectrometer to 1 scfh (0.47 l/min).
-
If you are using an accessory that is purged, set the purge gas controls for the accessory as indicated below.
- Accessory pressure, 5 psig (34 kPa)
-
Accessory flow: 4 –10 scfh (1.9 – 4.7 l/min)
Flow rates greater than recommended values can cause vibration, which can affect the quality of your data.
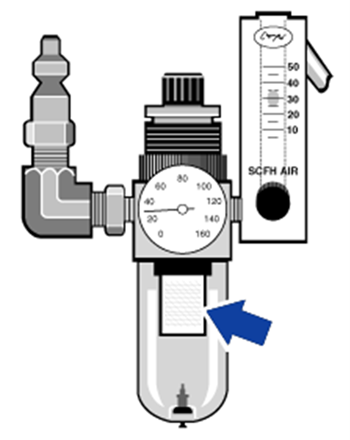
Check and Change the Purge Gas Filter
Replace the purge filter when it is yellow, or otherwise discolored, or if it is contaminated with debris or foreign particles.
|
We recommend maintaining seal and desiccation and/or purging the instrument at all times. Equipment damage due to failure to maintain seal and desiccation and/or purge is not covered under the warranty. If you have questions about this requirement, please contact us. |
The purge filter is located inside of the plastic bowl below the pressure gauge
To order parts, contact Technical Support.
To change the purge gas filter
- Turn off the purge gas at the main valve. Do not turn down the flowmeter or the pressure regulator.
-
Remove the plastic bowl that houses the filter and then remove the filter. (You can unscrew them both by hand.)
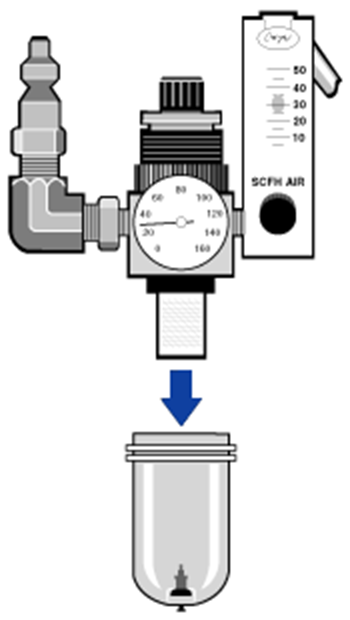
-
Install the new filter and then reinstall the bowl.
-
Open the main valve to turn on the purge flow to the instrument and verify proper purge gas flow rate.
Attachment(s):
| File | Last Modified |
|---|---|
| 110923_iS5 Unscrew Purge Gas Bowl.png | July 22, 2022 |
| 110922_iS5 Purge Gas Filter.png | July 22, 2022 |
| 110847_Purge Kit settings with num.png | July 22, 2022 |
| 110875_iS5 Purge Desiccant Cartridge.jpg | July 22, 2022 |
| 115385_summit desiccant cartridge removal.png | July 22, 2022 |
| 115350_Summit inside compartment captive screws.png | July 22, 2022 |
| 110847_Purge Kit with nums.png | July 22, 2022 |
| 110864_Install Purge Coupler.png | July 22, 2022 |
| 110863_Install Purge Nipple.png | July 22, 2022 |
| 110862_Install Purge Valve.png | July 22, 2022 |