Install the Touchscreen Monitor
Install the touchscreen monitor to save space in your lab and to take full advantage of OMNIC Paradigm software for touchscreen for quickly executing workflows and carrying out routine procedures.
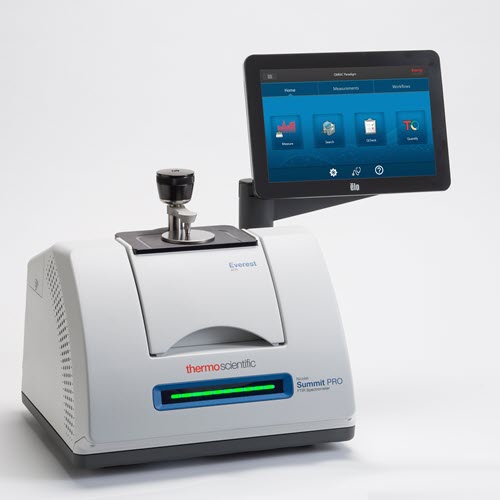
Tools and Materials Needed
-
Touchscreen monitor installation kit
-
Touchscreen monitor, with mount
-
New WiFi compartment cover with notch
-
9/64-inch hex driver
-
Time needed: 25 minutes or less
To install the touchscreen monitor
-
Prepare the spectrometer.
-
Press the power button to turn off the spectrometer and then unplug the power cord.
-
Turn off the purge, if applicable, and disconnect the purge line to the instrument and any accessory.
-
Remove any accessory from the sample compartment.
-
-
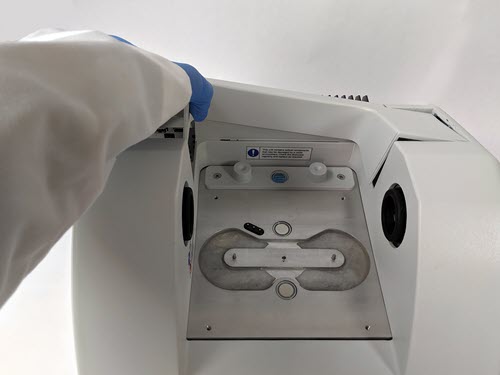
Remove the WiFi compartment cover from the back of the spectrometer.
While standing in front of the spectrometer, gently squeeze the left side of the cover and lift the cover up and off of the spectrometer, as shown in Figure 1. This cover can be discarded or stored for future use.
Gently squeeze the left side of the cover and lift it off of the spectrometer
-
Install the touchscreen monitor.
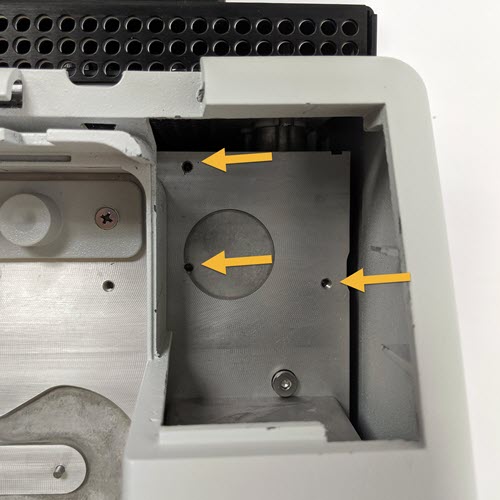
The base of the touchscreen mount attaches to the spectrometer with three captive screws, as shown in the figure below.
The base fits over three pre-drilled holes
-
Guide the front bottom of the mount into the compartment and then rotate the mount past the sides of the compartment, as shown in Figure 3.
Position the touchscreen mount over the three pre-drilled holes

-
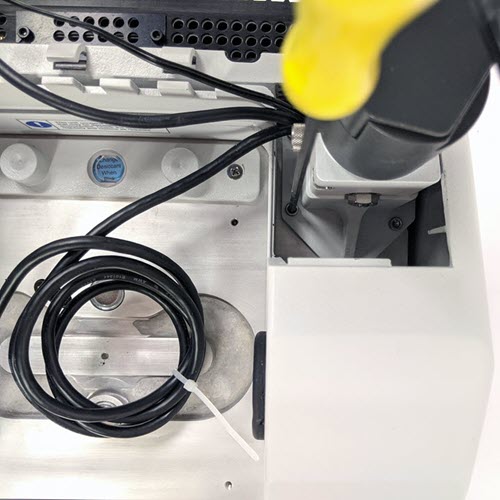
Using the 9/64-inch hex driver, begin tightening each of the three captive screws to ensure that the mount is aligned over the holes. Once each screw is started, finish tightening all of the screws until they are snug. You may have to rotate the screen out of the way to access each screw.
Rotate the screen out of the way if it is blocking access to the captive screw
-
-
Connect and position the three cables.
The touchscreen monitor connects to the spectrometer with three cables: an HDMI cable, a USB cable, and the power cable. We recommend routing the cables in the sequence described below to ensure that the cover sits properly over the cables.
-
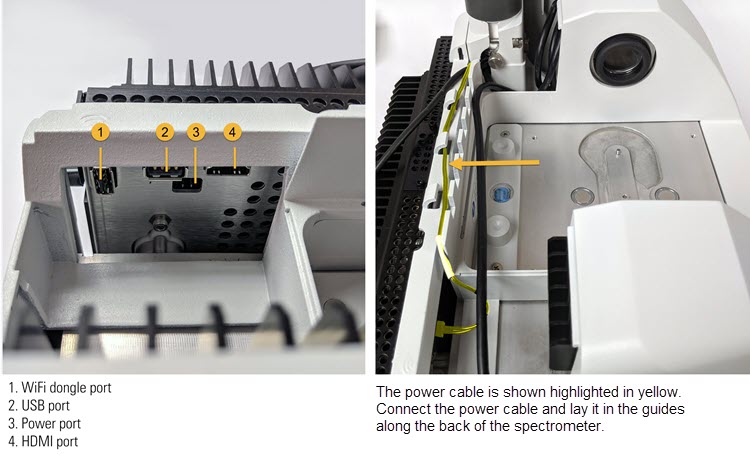
Plug the thin power cable into the power port and then lay the cable along the guides running along the top of the compartment, as shown in the figure below.
The three cables wrap behind the spectrometer’s sample compartment
-
Plug the HDMI cable into the HDMI port, but leave the cable outside of the cable guides for now. Slide the ferrite choke as close as possible to the HDMI port.
-
Plug in the USB cable and lay the cable on top of the thinner power cable in the cable guides.
-
Tuck the coiled portion of the HDMI cable into the compartment in front of the base of the touchscreen mount, as shown in Figure 6. It may be easier to roll the cable into place rather than pushing it.
Tuck the extra length of HDMI cable in front of the touchscreen mount

-
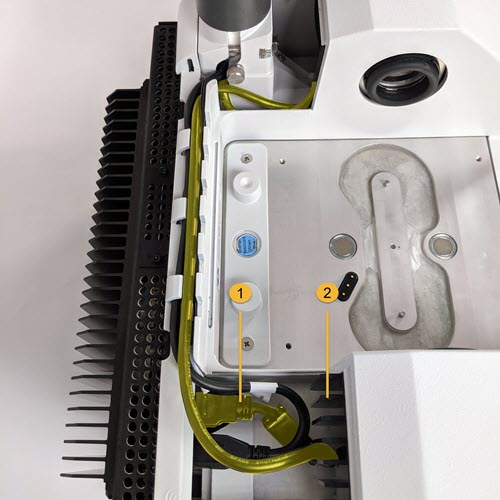
Lay the HDMI cable on top of the USB and power cables in the cable guides, and tuck any excess cable in front of the touchscreen mount.
If you have a Summit PRO spectrometer, route the HDMI cable between two of the vertical fins of the heat sink.
The HDMI cable should fit tightly along the side of the touchscreen mount. Excess or loose cable can obstruct the compartment cover and prevent the cover from closing.
The three cables fit in the cable guides along the back of the spectrometer
-
-
Install the new cover and turn on the spectrometer.
-
Insert the tabs on the cover’s right edge into the slots in front of the touchscreen mount, and then lower the cover over the cables and press the cover down until it snaps into place. There should be only a thin, uniform gap between the covers.
Position the cover around the touchscreen mount first, then lower it into place


Avoid shock hazard.
To ensure a good ground connection and avoid shock hazard, do not use an outlet that is connected to a conduit ground. The ground must be a noncurrent-carrying wire connected to earth ground at the main distribution box.
-
Plug in and power on the spectrometer.
-
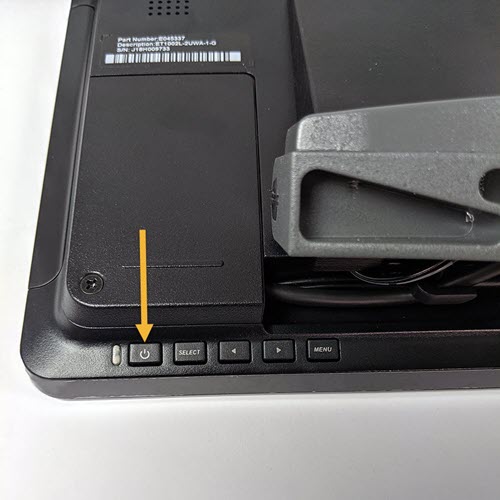
To turn on the touchscreen, press the power button on the rear side of the monitor.
-
Congratulations. Your touchscreen monitor is installed and ready for use. With the touchscreen monitor installed, you can open OMNIC Paradigm software and switch to the touchscreen interface for a convenient, streamlined experience.
Attachment(s):
| File | Last Modified |
|---|---|
| 115406_Summit touchscreen monitor power button.jpg | July 25, 2022 |
| 115404_Summit install touchscreen place cover.jpg | July 25, 2022 |
| 115405_cables with HDMI highlight.jpg | July 25, 2022 |
| 115401_summit touchscreen install hdmi in cavity.jpg | July 25, 2022 |
| summit attach touchscreen ports and cables.jpg | July 25, 2022 |
| 115403_summit touchscreen tightening screws.jpg | July 25, 2022 |
| 115395_Summit install touchscreen arm steps.jpg | July 25, 2022 |
| 115399_summit touchscreen arm cavity edited.jpg | July 25, 2022 |
| 115398_summit remove cover no touchscreen arm.jpg | July 25, 2022 |
| 115396_Summit install touchscreen attached.jpg | July 25, 2022 |

