About Workflows
You can use the workflow features in OMNIC Paradigm software to automate important procedures and frequent tasks. A workflow is a series of software operations that can be initiated with the click of a button. The software operations are represented by tiles, which you drag and drop onto the workflow canvas in OMNIC Paradigm software. You can specify settings for data collection, provide instructions for operators, and define data processing, reporting, and archiving in advance. Once a workflow has been created, operators can use it repeatedly to complete the steps the same way every time.
This article provides an overview of these basic workflow features and tools:
- Workflow pane
- Run Workflow window
- Workflow editor
Workflow Pane
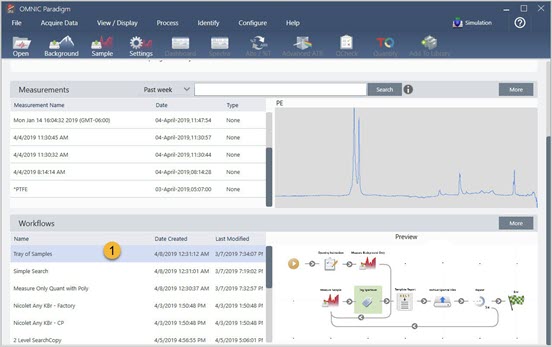
The workflow pane is always available at the bottom of the OMNIC Paradigm dashboard. Use this space to preview and run workflows you’ve created, and to open the workflow editor to edit or create a new workflow.
Workflow Pane on the OMNIC Paradigm Dashboard
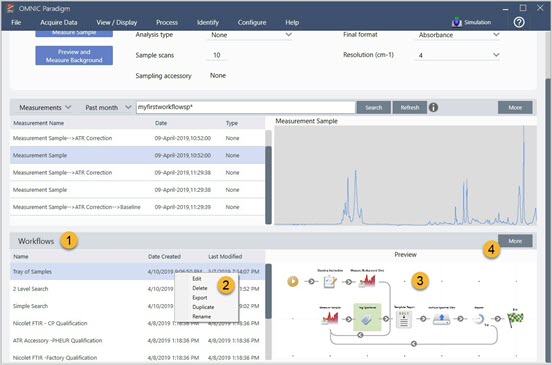
- Most recent workflows (click once to preview a workflow; click twice to open it)
- Right-click a workflow for more options
- Preview of a selected workflow
- Enlarge or reduce the Workflows pane
|
To do this... |
Take this action |
|
Select and preview a workflow |
Click once on the workflow name |
|
Test or run a workflow |
Right-click the workflow and select Run. This opens the Run Workflow window where you can step through the workflow tasks. |
|
Edit, rename, duplicate, delete or export the selected workflow |
Right-click the workflow and choose an option from the shortcut menu. |
Run workflow window
Use the Run Workflow window to test or run a workflow. To open the run Workflow window, right-click a workflow and select Run.
Right-click a workflow and select Run
From the Run Workflow window, use the arrow button to move to the next task in the workflow. The workflow will run exactly as it has been designed, with tasks and operator messages displayed as indicated by the workflow.
Run Workflow Window
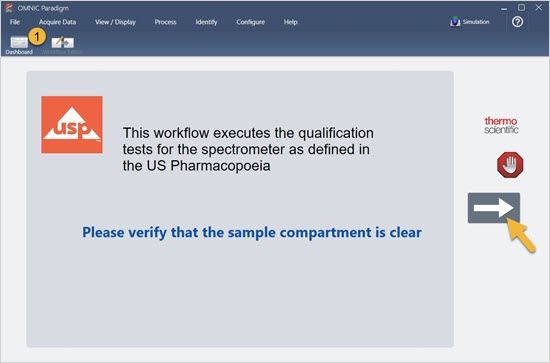
To stop the workflow and return to the dashboard, click the Stop button in the Play Workflow window. (If the workflow doesn’t have a Stop button, click the Dashboard button on the toolbar to stop the workflow.)
Workflow Editor
The workflow editor contains all the tools for creating workflows, including the workflow menu, toolbar, tile selection bar, and canvas. To open the workflow editor, right-click a workflow name on the dashboard and choose Edit from the shortcut menu.
You can also open the workflow editor from the OMNIC Paradigm main window by choosing:
File (menu) > Workflows > Create Workflow
The workflow canvas is where you select and set up the tasks you want the workflow to perform and join tasks together to create the workflow. The workflow editor opens with the mandatory “Workflow Start” and “Workflow End” tiles displayed on the canvas. Available settings for each tile in the current workflow are in the expandable sections below the canvas. Tools for scrolling, zooming and resetting the canvas view are at the right. A handy toolbar is above the canvas.
Workflow Editor
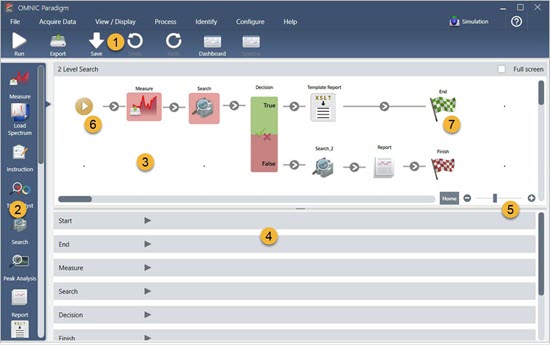
1. Toolbar
2. Tile selection bar
3. Canvas
4. Tile settings
5. Tools to adjust and reset the canvas
6. Start tile
7. End tile
Each task is represented by a colorful tile in the tile selection bar. Here are some commonly used examples:


Tools for creating, opening, and exporting workflows are located in the Workflow submenu (available from the OMNIC Paradigm File menu). Example workflows, available here, are a good place to start, or you can create a workflow from a spectrum’s history. See “Create and Run Your First Workflow” for details.
Tiles can be added, moved, copied and deleted to create the desired workflow. For more information, see the article titled “Edit a Workflow.”