Instrument diagnostics
The OMNIC Paradigm software provides various diagnostic tools to maintain system performance and ensure data accuracy. These tools differ based on your instrument, so refer to your instrument user guide for more information on using these helpful features.
System Status
The system status provides you with up-to-date information on your system, including which instrument you are connected to and if there are any potential issues. When the icon displays a green check mark, you can select it to view further details on your instrument. If the system status icon turns yellow or red, it indicates a problem with your system. In this case, selecting the icon will provide you with more information on the issue at hand.

Qualification and Performance Verification Workflows
Qualification and Performance Verification (PV) workflows run a series of factory-specified tests against a known standard to ensure that your system is running well and measuring data accurately. See your instrument user guide for a description of the available qualification and PV workflows.

Instrument Health
Instrument Health is used to connect your system to your Thermo Fisher Connect account. With Thermo Fisher Connect, you can monitor multiple instruments from one location, back up your data to the cloud, and share telemetry data with Thermo Fisher Scientific to help us improve your software in the future.
For more on instrument health, see “Connect an instrument to a Thermo Fisher Connect account.”
Align, Reset, and Calibrate Instrument Components
After certain maintenance procedures or if a qualification or PV workflow fails, you may need to align your instrument optics. The alignment tools in OMNIC Paradigm software can help get your instrument back into a good working state. See your instrument user guide for more information about when to align, calibrate, or reset optics.
Performance test
The new performance test checks your combination of beamsplitter, detector, and sampling location to verify that your instrument setup will measure high-quality data.
To run the performance test
- Open the Acquire Data menu and select Diagnostics > Performance Test.
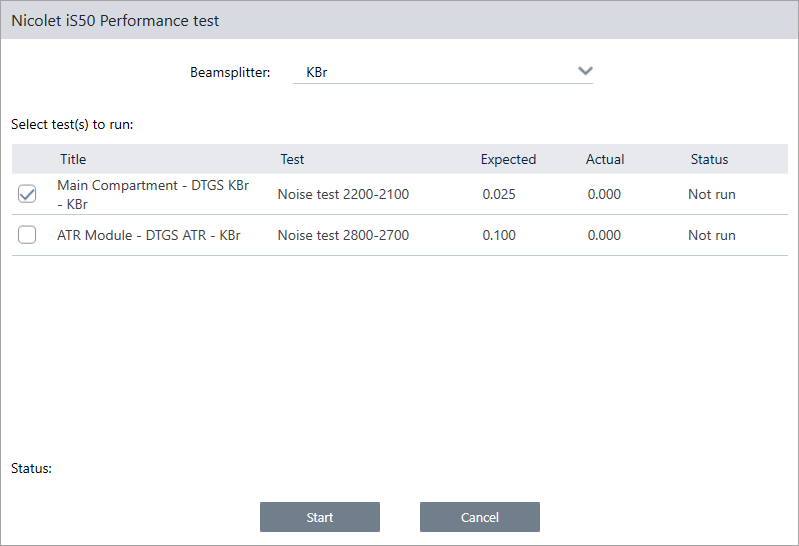
- Select the beamsplitter to use in the test.
- Select the test or tests that you want to run.
- Click Start and follow any on-screen prompts.The status shows "Test(s) completed" when the tests are done.
Diagnostics bundle
If you are working with technical support to troubleshoot an unusual issue, you may be asked to provide diagnostic files that can help the support team identify and solve the problem. Use the Gather Log Files tool in the Help menu to quickly bundle all the files the support team needs.