Secure, Managed Workflows
“Managed workflows” is a new feature that gives you more control over workflows when using Security Suite software with OMNIC Paradigm software. Previously, security administrators could use access controls to limit which features users could access, and they could enforce system policies to manage digital signatures and other rules. With managed workflows, administrators now have even more control over how workflows are developed, used, and archived.
Managed workflows use secure folders to track the status of workflows and to limit access to them in each state.
Key concepts and features
To get the most from managed workflows, you should understand the following concepts and features:
Concepts
User roles
The user role determines what a user can do with workflows. These roles are determined by System Policies in Security Administration software, but they should match groups and permissions set up by the IT administrator. See "Setting up Managed Workflows" for details.
-
Operator: Operators are the people who run workflows to analyze or process data. These people can only run workflows. They cannot edit, approve, or change their state.
-
Developer: Developers are the people who create or edit workflows. They can create new workflows and revise old workflows. However, they cannot unlock a currently approved and in use workflow. Only an approver can unlock a workflow for editing.
-
Approver: Approvers are managers of the workflow’s state. They can approve workflows to move them from in development to approved and in use, can archive obsolete workflows, and can unlock or restore workflows. Approvers must also provide a digital signature when approving an action. Approvers can also be developers.
-
Security Administrator: The security administration sets up policies in Security Administration software. This person does not work on workflows in OMNIC Paradigm software.
-
IT Administrator: An IT Administrator is required to set up secure data folders and Active Directory groups.
Secure folders
Managed workflows use secure folders in Windows under a primary root folder. An IT administrator must create the root folder first, and then assign it in the Security Administration software. You can create the primary root folder on a network drive so that clients can share workflows across the network. A mapped drive or a UNC path should both work. If those clients have security enabled, they will all see the same secure root folder and should all see the shared workflows on the network and enforce the managed workflow behavior.
Folder structure
The folder structure will look like this:
-
<Root secure folder> (The default location in Security Administration software is C:\Secure Data)
-
\Workflows
-
\Approved
-
\Archived
-
\Development
-
An IT administrator must create the entire folder structure either locally or on the network before setting up polices in Security Administration software. Later, you will enter the <root secure folder> path into Security Administration software using the "Paradigm secure data folder" setting.
Features
States and actions
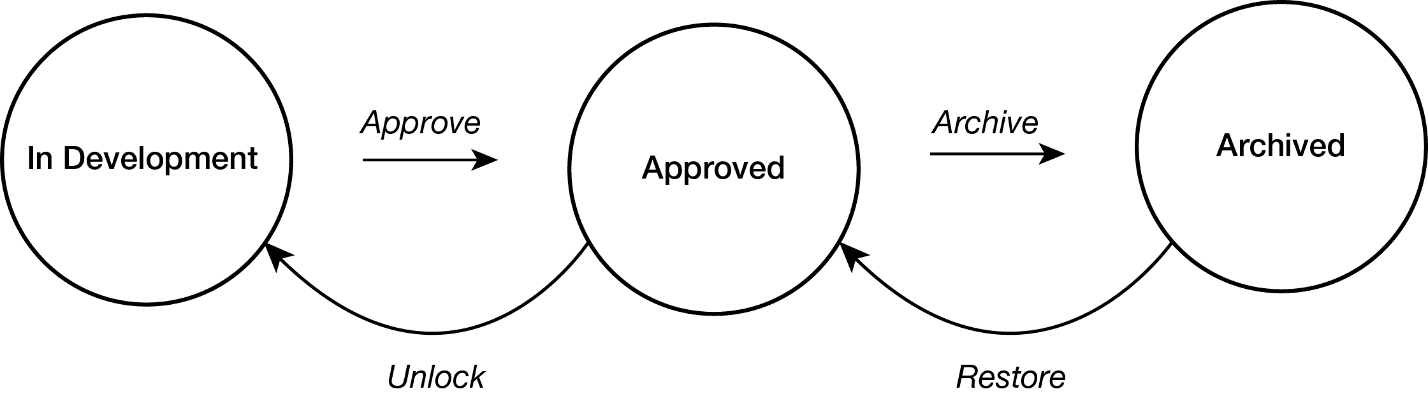
States
|
State |
Description |
|---|---|
In Development |
These are workflows that are currently under construction. They may be new workflows or old workflows that are undergoing revision. These workflows are visible only to developers and approvers; operators cannot run them. When a workflow is ready for use, it is ready to receive approval. |
| Approved |
Approved workflows are workflows that are currently in use. Operators can see and run only approved workflows. |
| Archived |
Archived workflows are locked and cannot be edited or used. They are saved for record keeping. Only approvers can view archived workflows. |
Actions
|
State |
Description |
|---|---|
Approve |
Approving a workflow moves it from development to approved so that operators can run it. The software appends the workflow version to the workflow name, and the workflow is locked and can no longer be edited unless it is unlocked by an approver. Approval always requires a digital signature, even if the “Require digital signature when saving a workflow” system policy is disabled. |
| Archive |
Archiving a workflow locks it so that it can no longer be edited or used. These workflows are saved for record keeping. |
| Unlock |
Unlocking a workflow copies a workflow from the Approved state back to the Development state. The software removes the version information from the workflow's name and marks the new, copied, workflow as unlocked. Developers can see this new workflow and can work on it. Note that the original, approved, workflow remains approved. If you no longer want the workflow to be available to operators, you must also archive it. |
| Restore |
Restoring a workflow moves it back from the Archived state to the Approved state. If other versions of the workflow are already Approved, those workflows are moved to the Archive state. For example, if you had previously archived Workflow001 and replaced it with a newer Workflow002, when you restore Workflow001, 001 moves back to the Approved state and operators can use it while the newer Workflow002 is locked and moved to the archive. |
Setting up Managed Workflows
Setting up and using secure workflows requires you to …
-
Configure a secure data folder and subdirectories,
-
Set appropriate permissions,
-
Enable policies in Security Administration software.
| Important |
These instructions assume that your IT administrator has already created Active Directory groups and has added users to those groups. The instructions below assume the following groups exist:
|
Create the secure data folder
-
Create the Secure data folder on the file server (e.g., OMNIC Paradigm Data).
The default value in Security Administration is `C:\Secure Data`. You will later change this to match the folder created in this step.
-
Create the following subfolder structure within the Secure data folder:
-
Workflows
-
Approved - contains all workflows currently approved for use.
-
Archived - contains all workflows that have been superseded or are no longer in use.
-
Development - contains all workflows currently under development.
-
-
-
Set up folder security permissions as shown in the table below:
Folder
Principal
Permissions
Notes
Secure data folder
Authenticated Users
-
Read & execute
-
List folder contents
-
Read
Allows any authenticated user to view and use workflows. The OMNIC Paradigm software will restrict access to workflows based on the user’s role in the software.
Workflows
Workflow approvers group
-
Full control
-
Modify
-
Read & execute
-
List folder contents
-
Read
-
Write
Allows members of the Workflow approvers group to manage workflows fully
Workflows\Development
Workflow developers group
-
Full control
-
Modify
-
Read & execute
-
List folder contents
-
Read
-
Write
Allows members of the Workflow developers group to create and modify workflows in development
-
Open the folder properties and go to the Security tab.
-
Click Advanced.
-
Select the Permissions tab.
-
Click Add
-
Click Select a principal.
-
Enter the appropriate Principal from the table and click Check Names.
-
Click OK.
-
Ensure the Type is set to Allow.
-
Ensure the Applies to is set to This folder, subfolders, and files.
-
Select the Basic permissions as shown in the table.
-
Click OK.
-
Repeat steps c-j for each Principal in the table.
-
Click OK.
-
-
Disable inheritance and remove all inherited permissions:
-
Open the folder properties and go to the Security tab
-
Click Advanced.
-
Click Disable inheritance and choose Remove all inherited permissions from this object.
-
Click OK.
-
Click OK.
-
-
If the Secure data folder is not under an existing share on the server, share the folder.
Granting Full Control to Everyone for the share avoids the issue where permissions when viewed using the UNC path are more restrictive than when viewed on the file server itself.
Set up File and Folder Auditing (optional)
This is an optional step to provide additional file access auditing. If you choose to enable auditing, you can monitor who is accessing the files and folders in the Secure data folder. Please reference the instructions in Microsoft Learn for more information on setting up auditing.
Enable policies in Security Administration software
After setting up Active Directory groups and creating the secure data folders, you must set up system policies in Security Administration software.
Managed workflows use the following system policies:
-
Secure data folder: Used to set the location of the secure data folder.
-
Enable managed workflows: a higher-level policy that enables the entire feature. If you disable this policy, the two policies below are ignored.
-
Managed workflows – ability to edit/create: Used to specify the developers.
-
Managed workflows – ability to manage approve, unlock and restore: Used to specify the approvers.
-
To enable policies and add users and groups to roles
-
Open Security Administration software.
-
In the left panel, go to OMNIC Paradigm > System Policies.
-
Select Secure data folder.
-
Select Browse and navigate to the secure data folder you set up in step 1 of “Create the secure data folder .” This is the top-level folder you created above the “Workflows” folder.
-
Select Change.

The Specify a location for secure data storage dialog appears.
-
-
Select Browse and navigate to the same folder you chose above with the Browse button.
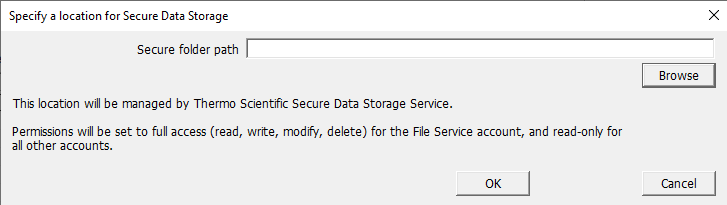
These locations must match.

-
Select OK.
-
Select the Enable managed workflows policy.
-
Select the checkbox to enable the policy.

Verify that the selected policy group is correct for your needs.
-
-
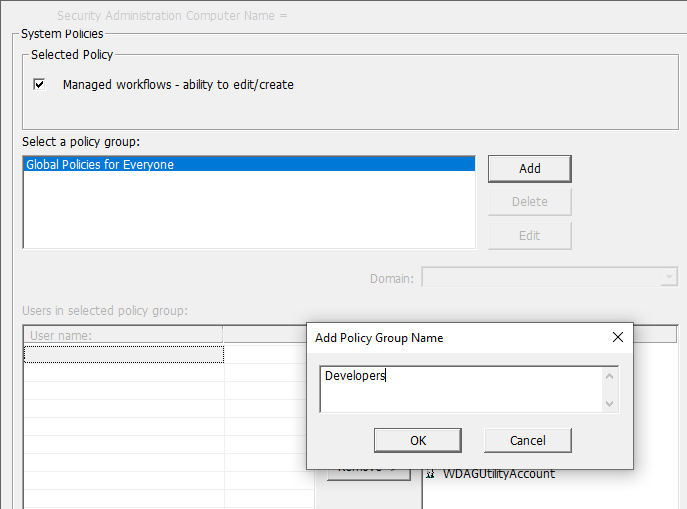
Select Managed workflows – ability to edit/create.
-
Enable the policy.
-
Create policy group for developers.
-
To create a new policy group, select Add.
-
-
-
In the Add Policy Group Name dialog, enter the name for your developers group. Select OK.
-
With “Policies for Developers” selected, add users and groups from the Names column to the Users in Selected Policy Group column. This should match the permissions set using the Active Directory groups when you created secure folders.
-
Select Managed workflows – Ability to manage approve, unlock and restore.
-
Enable the policy.
-
Create a policy group for approvers.
-
Select Add and enter a name for your Approvers group.
-
With “Policies for Approvers” selected, add users and groups from the Names column to the Users in Selected Policy Group column.
Note that you must select the policy group before enabling the policy. When you enable the policy, it is enabled only for the policy group currently selected.
This should match the permissions set using the Active Directory groups when you created secure folders.

-
-
-
Save your changes.
You are now ready to use managed workflows in OMNIC Paradigm software.