Vaporizer heater replacement
Issue
Vaporizer heaters can fail. This article describes how to replace one and what to watch out when replacing / re-assembling.
Environment
- TSQ Series
- Exploris Series
- Tribrid Series
Resolution
Disassembly
- Disassembly is done by first removing the Source Insert.
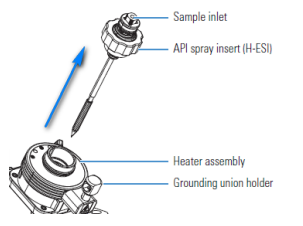
Figure 1: Removal of source insert
- Remove the “multi-axis-alignment assembly” from the source housing, refer to Figure 2.
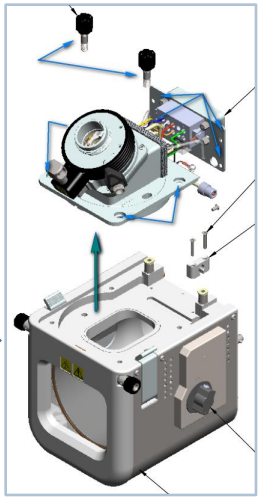
Figure 2: Blue arrows represent where the screws are located
Optamax NG Source
- Remove the heat shield (fixed by three secured screws) and pulling out the Vaporizer Heater itself from the “front” of the assembly (no screws), refer to Figure 3.
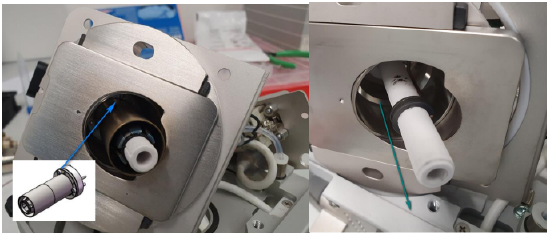
Figure 3: No screws in front of assembly
IonMax NG Source (Endura-Quantiva)
- The Endura-Quantiva “Nozzle” is missing the extended heat shield, which is present at the OptaMax NG Source.
- The nozzle is one metal part and does not consist of the “slide in” assembly (small inlay-picture at previous page).
- The difference at the vaporizer heater assembly is the position of the temperature element.
- The dis-assembly is similar: Removing the Nozzle/Heat Shield by three screws – then pulling out the vaporizer heater itself – as outlined in the pictures above.
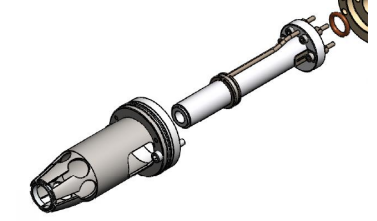
Figure 4: Vaporizer heater being pulled out
Re-assembly
- When putting the replacement heater in place take care of the right positioning of the Viton o-ring in the back, refer to Figure 5.
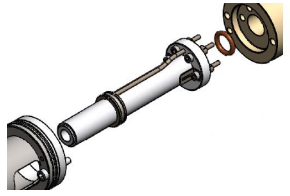
Figure 5: O-ring
- If the aluminum ring at the Heater Shield is contaminated or worn out – replace.
- New Heaters have grey appearance and act slightly like a spring when compressed. That will facilitate the new heater to slide in. If the ring is corroded (often black then), it kinks easily, and the new heater might not fit in properly.
- Connected to the above is the possibility to mis-align the position of the heater shield / nozzle by obstruction of the aluminum ring – leading to the “nozzle type assembly” pushed into the heater shield.
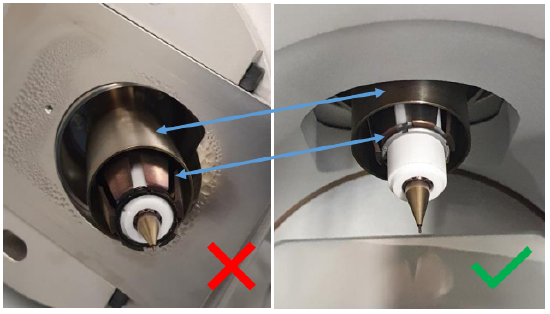
Figure 6: Visible condensation in the source housing in the case
- If this has happened: correct or replace the aluminum ring. Re-install the nozzle assembly by pushing it back into its place until it snaps into an inner groove. This can be felt. Tension can be adjusted by opening/closing the slit.
- Note: the IonMax NG (Endura-Quantiva) “Nozzle” is missing the extended heat shield. The nozzle is one metal part here and does not consist of the “slide in” assembly. Push in the replacement vaporizer heater, taking care that the Viton o-ring is right in place. Push the Nozzle Assembly over the heater back in place taking care that the aluminum ring is ok and secure the screws.
- Remount the “multi-axis-alignment assembly” to the housing.
- Put Source Insert back in place.
Cause
- Leak from needle installed in spray insert
- Improper use of divert valve delivering eluent when heater is on and gasses are off
- Heat applied without proper nitrogen flow
- Insufficient (initial) instrument equilibration before starting sequence
- Accumulation of liquid in source housing while MS in standby (divert valve misuse)
- Contamination of heater surface leading to arcing
- Normal breakdown due to use / lifetime