Collect time series data
With a Time Series analysis, you can measure a series of data to identify and analyze change over time, such as in a TGA or GC analysis.
Preparing for data collection
Before you measure time series data, review and edit your measurement settings.
To view and edit settings for a Time Series analysis
-
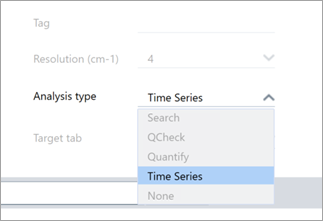
Set your Analysis type to Time Series.
-
Select More to view all additional settings specific to your Time Series analysis.
| Setting | Description |
|---|---|
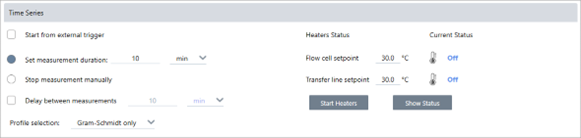
| Start from external trigger |
Select this option if you are using a remote start cable to trigger Time Series data collection automatically. For further details, see the documentation for your spectrometer or other accessories. |
| Set measurement duration |
Set the length of the measurement. The measurement will stop automatically after the set time, but you can stop the measurement earlier if you choose. |
| Stop measurement manually |
Continue measuring until you stop the measurement manually. |
| Delay between samples |
Normally, the interval between samples is determined by the resolution, mirror velocity, and the number of scans per spectrum. You can use this option to manually set a longer interval between measurements. This can be useful if you know that your sample changes very slowly and want to limit the amount of data collected, for example. |
| Save interferograms | Select to save interferograms with your series data. This will increase the size of the saved data but may be useful for processing or analysis in the future. |
| Profile selection |
Use this option to automatically apply a profile from your Favorites in addition to the Gram-Schmidt profile. |
| Heaters |
If you are using a GC accessory, the Time Series settings also include settings for your heaters. The current status shows whether the heaters are off or displays their current temperature.
|
Starting your Time Series measurement
After setting Time Series as your analysis type and reviewing your measurement settings, you are ready to start your analysis.
To measure Time Series data
-
Select Measure Time Series.
The background preview opens in the target tab.
-
Select Start Background Measurement and wait for the measurement to complete.
-
Select Start Time Series Measurement.
The Time Series measurement starts. During the measurement, the display shows the Gram-Schmidt profile in the top pane and the most recent spectrum in the bottom pane.
If you set a specific duration, the measurement continues until the duration and stops automatically. Otherwise, select Stop to end the measurement.
During the measurement, you can create and apply profiles or select points to view the spectrum at that time.