Replace the Source
The IR source is easily accessible from the bottom of the spectrometer and can be replaced without having to remove the spectrometer’s cover.
Tools and materials needed
- A #1 Phillips head screwdriver
- Source Replacement Kit
 |
Before replacing the source, turn off the instrument. Replace the source only with replacement parts supplied by us. |
To replace the source
-
Turn off and disconnect the spectrometer.
- Turn off the instrument and unplug the power cord.
-
Disconnect any cables from the instrument, such as the Ethernet cable or USB devices.
-
If the spectrometer or an installed accessory is purged, disconnect the purge lines from the spectrometer and the accessory (quick connect fittings stop the flow automatically). See "Install and Maintain a Purge Kit" for more information.
-
Remove any installed accessories from the instrument.
Avoid burn hazard. The source becomes extremely hot while you are using the instrument. Wait at least 10 minutes after turning the instrument off before you perform the next step.
-
Remove the source.
-
If your spectrometer has the touchscreen monitor attached, move the monitor to the storage position, as show in Figure 1.
Summit PRO spectrometer with touchscreen monitor in the storage position

-
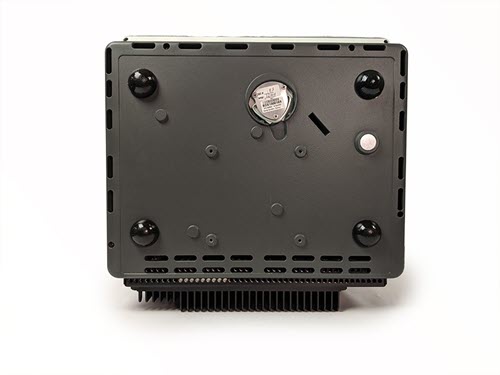
Carefully tip the instrument back until it rests on the fins of the heat sink. Do not use the touchscreen monitor to support the weight of the spectrometer.
-
Use a #1 Phillips head screwdriver to fully loosen the three captive screws that hold the source in place.

-
Swing the bale out. Steady the instrument with one hand and pull firmly on the bale to pull the source straight out of the instrument.
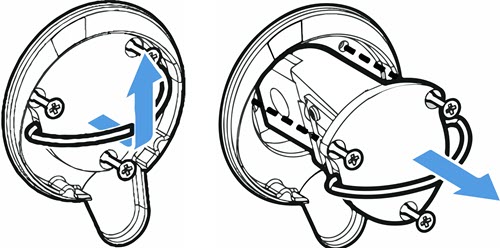
Never touch a source element with your bare fingers. Skin oils or other deposits on the element will shorten its life. Always use clean finger cots, gloves, or clean laboratory tissue when handling a source element.
-
-
Insert the new source.
-
Make sure the three captive screws are straight and then slowly insert the source into the cavity until the source mount is flush with the instrument.
-
Tighten the screws to secure the source and snap the bale into its storage position.
-
-
Reconnect and power on the spectrometer.
-
Carefully return the instrument to its upright position and reconnect any cables you removed.
-
Replace the desiccant. See "Replace the Desiccant" for instructions.
Because the internal optics are exposed to the atmosphere when removing the source, the desiccant should always be replaced after replacing the source.
Avoid shock hazard.
To ensure a good ground connection and avoid shock hazard, do not use an outlet that is connected to a conduit ground. The ground must be a noncurrent-carrying wire connected to earth ground at the main distribution box.
-
Plug in the power cord to the instrument and press the power button to turn on the spectrometer.
Do not install any sampling accessing until after you have aligned the spectrometer and verified its performance
-
-
Verify the spectrometer’s performance.
Before taking the following steps, make sure there is not a sampling accessory in the sampling compartment.
-
Align the spectrometer optics.
- From the dashboard of OMNIC Paradigm software, go to Acquire Data > Diagnostics > Align Spectrometer.
- Select Start to begin alignment. The screen says "Align complete" when alignment has finished successfully.
-
Calibrate the laser.
- Go to Acquire Data > Diagnostics > Laser Calibration.
-
Select Start to begin calibration.
Laser calibration may take several minutes to complete. When calibration is finished, the display shows "Measurement complete" and indicates any change in laser frequency.
The instrument takes up to 12 hours to come to thermal equilibrium. For best results, re-run alignment and calibration after the first 12 hours of operation.
-
Run thet Nicolet FTIR – Factory Qualification workflow. Performance verification and qualification workflows use a polystyrene reference material inside the spectrometer to run a series of standard tests to verify your instrument operation and to ensure the accuracy of your data.
- Return to the Dashboard.
- Scroll to the Workflows pane and select Nicolet FTIR - Factory Qualification.
- Right click the workflow and select Run to start the workflow.
-
- Replace any accessories that you removed earlier.
Attachment(s):
| File | Last Modified |
|---|---|
| source remove illustrations.jpg | July 22, 2022 |
| 115393_iS5 Remove Source ScrewsnoNotch.png | July 22, 2022 |
| 115389_Summit bottom source.jpg | July 22, 2022 |
| 115391_Summit touchscreen in storage position.jpg | July 22, 2022 |